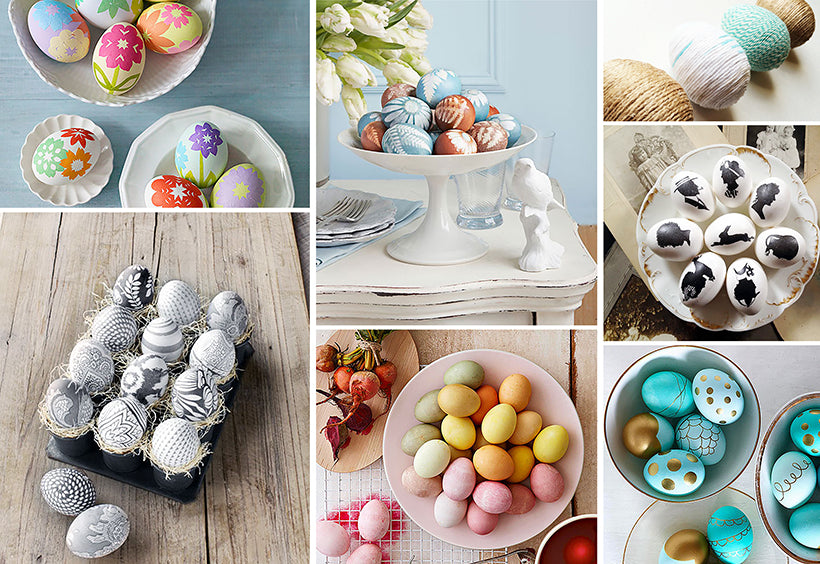
5 Chic Ways To Decorate Easter Eggs
Easter, the delightful holiday with a peculiar tradition of coloring eggs, and the anticipation of a magical bunny rabbit. At first glance, it seems eggs and rabbits have nothing in common. However, both elements have been symbols of spring and rebirth for thousands of years. Overtime, traditions merged together, which created our current association with eggs and the easter bunny within the celebration of Easter.
In honor of this bright and festive holiday, we created a list of 5 awesome ways to decorate your Easter eggs!

The Silhouette- The wonderful thing about this technique is that it doesn't require special transfer paper or expensive equipment. If you have some white tissue paper, Mod Podge, a glue stick and a printer, you can make Silhouette Easter Eggs!
Materials:
-Hardboiled eggs
-White tissue paper
-Silhouette images (The Graphics Fairy is a great resource)
-A sheet of copy paper
-Glue stick
-Scissors
-Mod Podge
-Paint brush
Instructions:
1. Glue tissue paper to standard copy paper. Only apply glue to top strip of paper. Trim to fit.
2. Feed paper into printer, and print silhouettes. (tissue side up)
3. Separate tissue paper from copy paper, and cut out silhouettes.
4. Brush Mod Podge onto the section of the egg where the silhouette will be applied. Apply tissue silhouette, upside down so that the ink side contacts the glue and egg.
4. Once the Mod Podge has dried, use a flat surface to smooth out any remaining bubbles
Tip! Print silhouette document using a "DRAFT" setting (under printer preferences). This will prevent the tissue paper from being overly saturated with too much ink.
See full instructions at: Jennuine

Botanical Eggs- Adorned with the delicate shapes of greenery and herbs to announce the arrival of spring!
Materials:
-Hard boiled eggs (or blown eggs)
-Small paint brush
-Leaves or herb sprigs
-Tweezers
-Nylon stocking
-String or hair tie
-Liquid food coloring
-White vinegar
Instructions:
1. With a tiny paintbrush, apply egg white to the back of a leaf or sprig; use tweezers to center it on the egg, and press down gently with your fingers.
2. Cut a nylon stocking into 5-inch tubes. Stretch open one side of a tube, carefully wrapping it over the leaf to hold it in place, then pull remainder around the egg. Tie with string.
3. Dunk nylon wrapped egg into the dyed vinegar for 5 minutes.
4. Remove egg from dye, and blot dry. Untie the nylon, and carefully peel away the leaf.
Tip! While eggs are soaking, use spoon and continuously pour dye over floating portion of egg.
See full instructions at: Martha Stewart

String Wrapped Eggs- Stop worrying about breaking eggs! Opt for craft-worthy paper mâché eggs instead.
Materials:
-Paper mâché eggs (hardboiled eggs also work)
-String
-Clear tacky glue
-Scissors
Instructions:
1. Start by gluing one end of the string to the top of your paper mâché egg.
2. Then make a short line of glue a little ways down your egg, and start wrapping.
3. Once you reach an area with no glue, apply another small strip of glue and keep wrapping until the entire egg is covered.
Tip! You may need to clean your fingers during the process, which helps to keep the glue from covering the outside of your string.
See full instructions at: Bsaz Creates

Metallic Eggs- Add a sophisticated touch to your eggs with gold and silver metallic paint-pens.
Materials:
-Hard boiled eggs
-Gold or silver metallic paint-pen
-Liquid food coloring
-White vinegar
Instructions:
1. Create egg-dye by combining 1/2 cup boiling water, 1 teaspoon of white vinegar and 20 drops of food coloring.
2. Dunk cool, hardboiled egg into egg-dye. Let soak to achieve desired saturation.
3. Remove and allow eggs to fully dry.
4. Use your imagination! Use your metallic paint-pen and create a masterpiece.
Tip! Tape off stripes or apply paper shapes to achieve straight lines.
See full instructions at: Better Homes & Gardens

Silk Dyed Eggs- Make use of those ugly neck ties!
Materials:
-Hardboiled eggs
-100% silk pattern
-Old pillowcase, or lightweight fabric
-White vinegar
-String or twist-tie
Instructions:
1. Wrap entire egg tightly with 100% silk fabric. Make sure the front of the fabric is facing the egg. Tie off tightly.
2. Next, wrap eggs with part of an old pillowcase, or other lightweight fabric. Tie off tightly.
3. Separately fill medium sized cooking pot with water and 1/4 cup white vinegar.
4. Add wrapped eggs, cover pot and bring to a boil for 20 minutes.
5. Remove eggs. Let cool, then remove wrapping to reveal the beautiful patterns.
Tip! Your silk doesn’t need to be black and white, colorful designs also work.
See full instructions at: Our Best Bites